


How to create a GTFS with WatriFeed trough OpenStreetMap data ?
WatriFeed-GTFS-Manager: The OpenSource Collaborative GTFS Data Editor. WatriFeed is a collaborative web editor for GTFS data developed by the Data Transport project labs to standardize transport data for easy use in transport and mobility applications and services.
Step I: Import of OSM data through Overpass Turbo
The first step is to export the mapping data of the transportation lines from OSM. As an example, we take the mapping of the Sotrama lines in Bamako.
We will use 2 tools for the export:
1. OSM relation analyser :
To find the mapped lines via the identifiers of their relations http://ra.osmsurround.org/
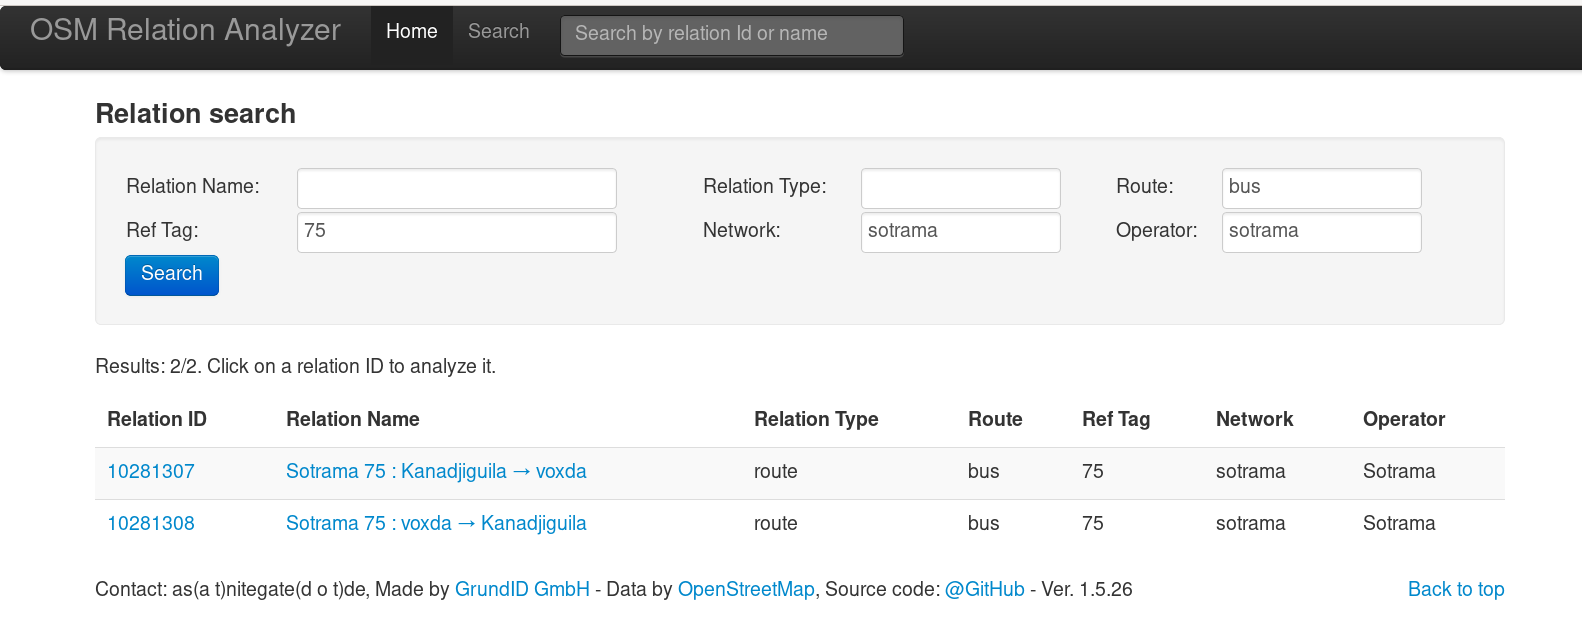
We have filed a request to find the link to line 75.
Sotrama 75: Kanadjiguila → voxda with the ID 10281307, this ID will allow us to export the data related to this line.
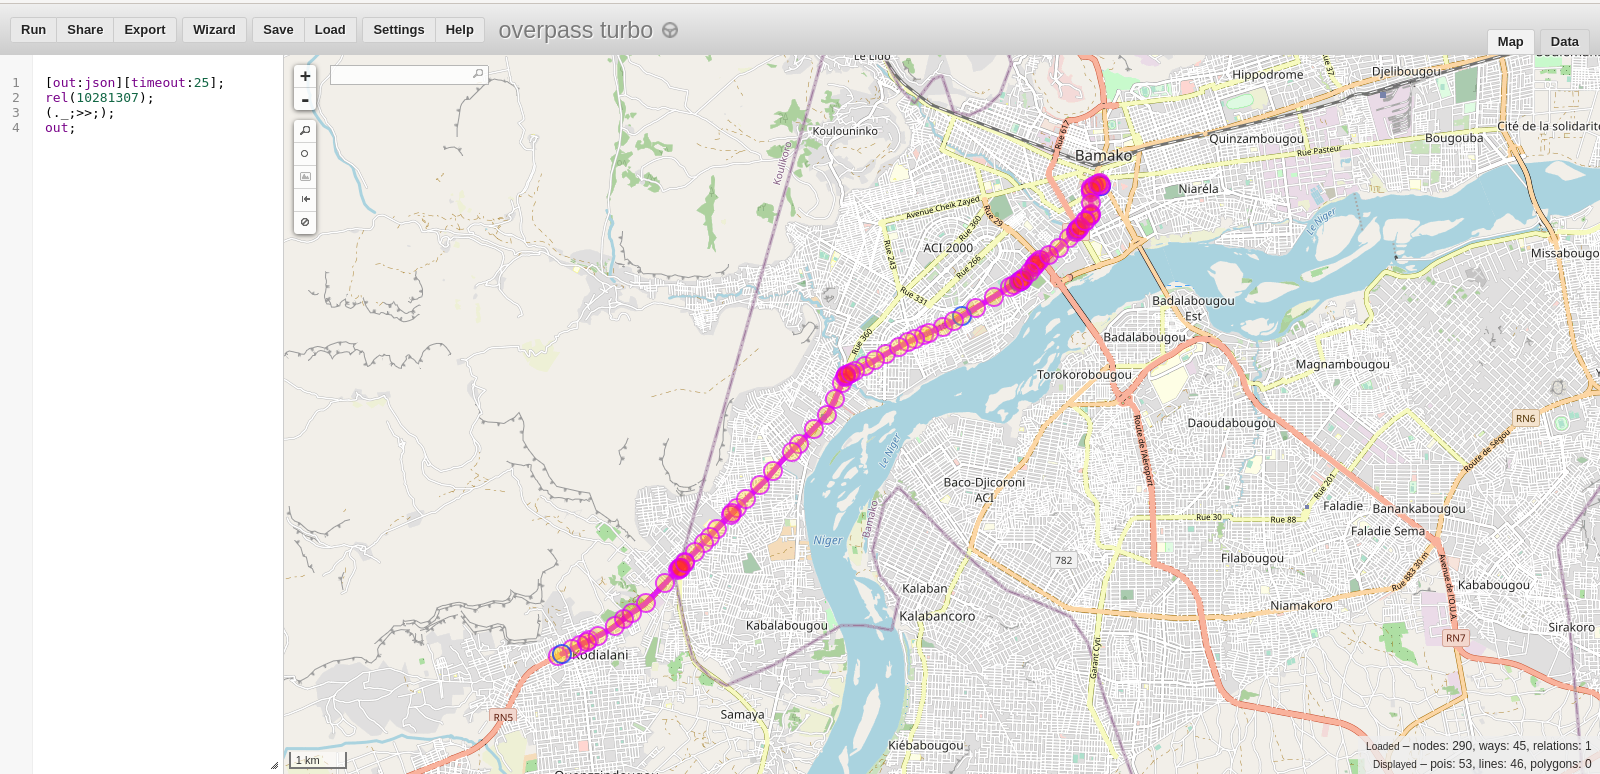
2. Overpass Turbo(www.overpass-turbo.eu ) : Pour exporter la donnée de la ligne 75, nous utiliserons la requête suivante.
[out:json][timeout:25];
rel(ID_Relation );
(._;>>;);
out;
We will replace the ID_relation of the request with the ID of our query link 10281307, meaning that our query will be :
[out:json][timeout:25];
rel( 10281307);
(._;>>;);
out;
As a result of our query with Overpass :
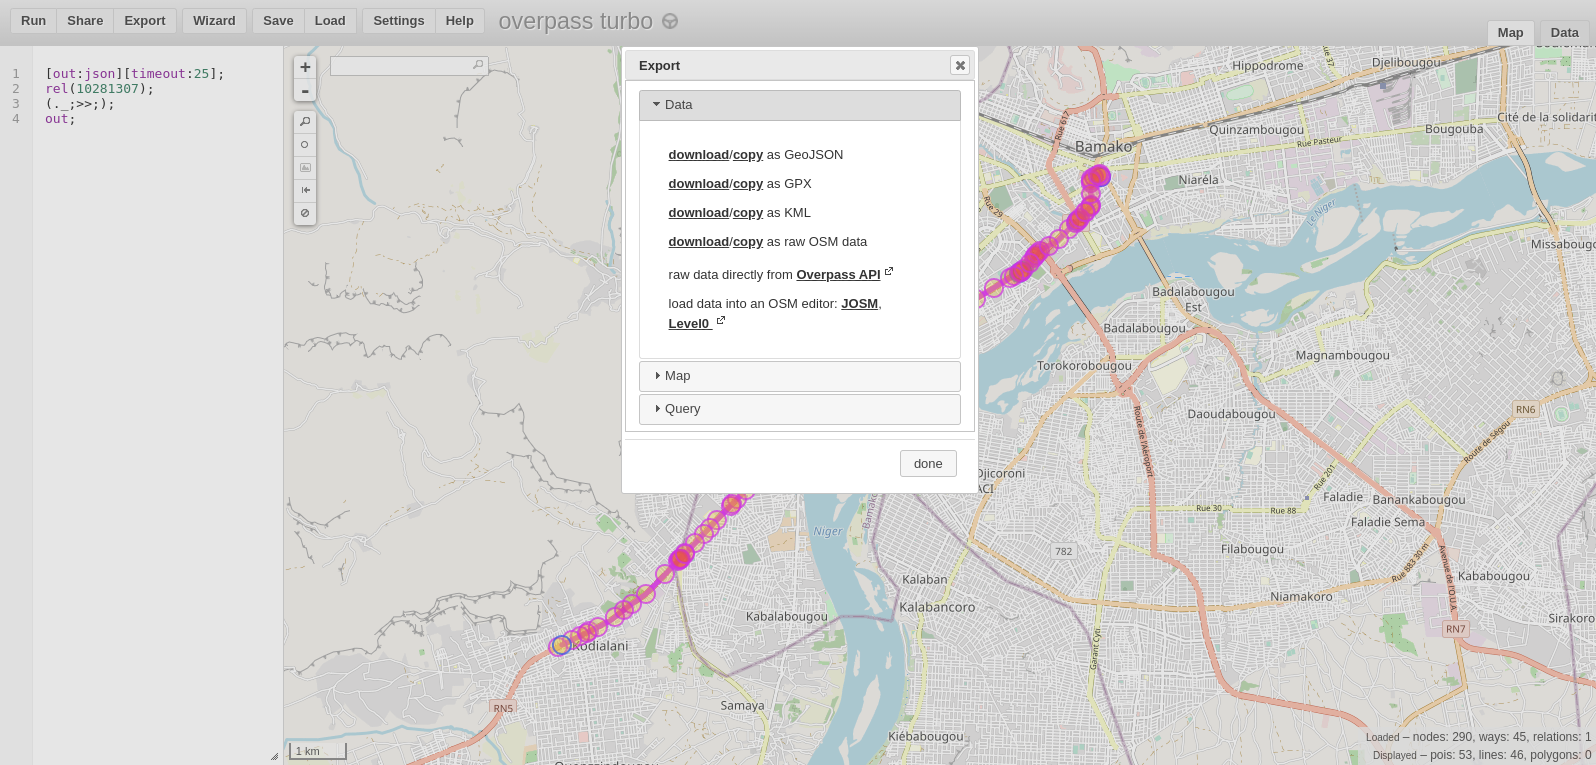
We must export our result to Geojson.
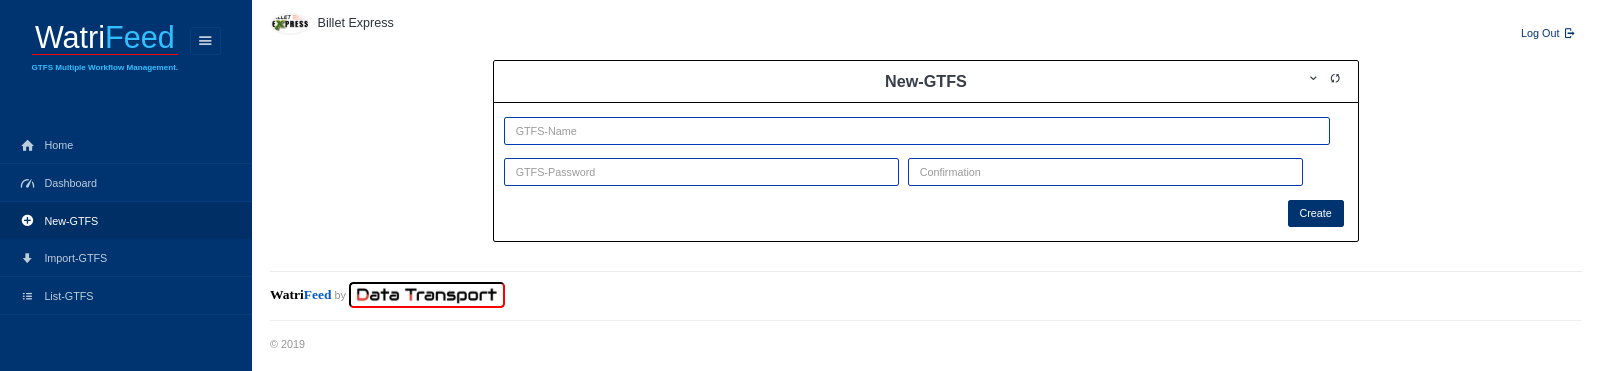
STEP II: Register for an account
Please create an account on https://watrifeed.ml/register then log in, then click on New GTFS, choose a name for your GTFS and a password for your editing.
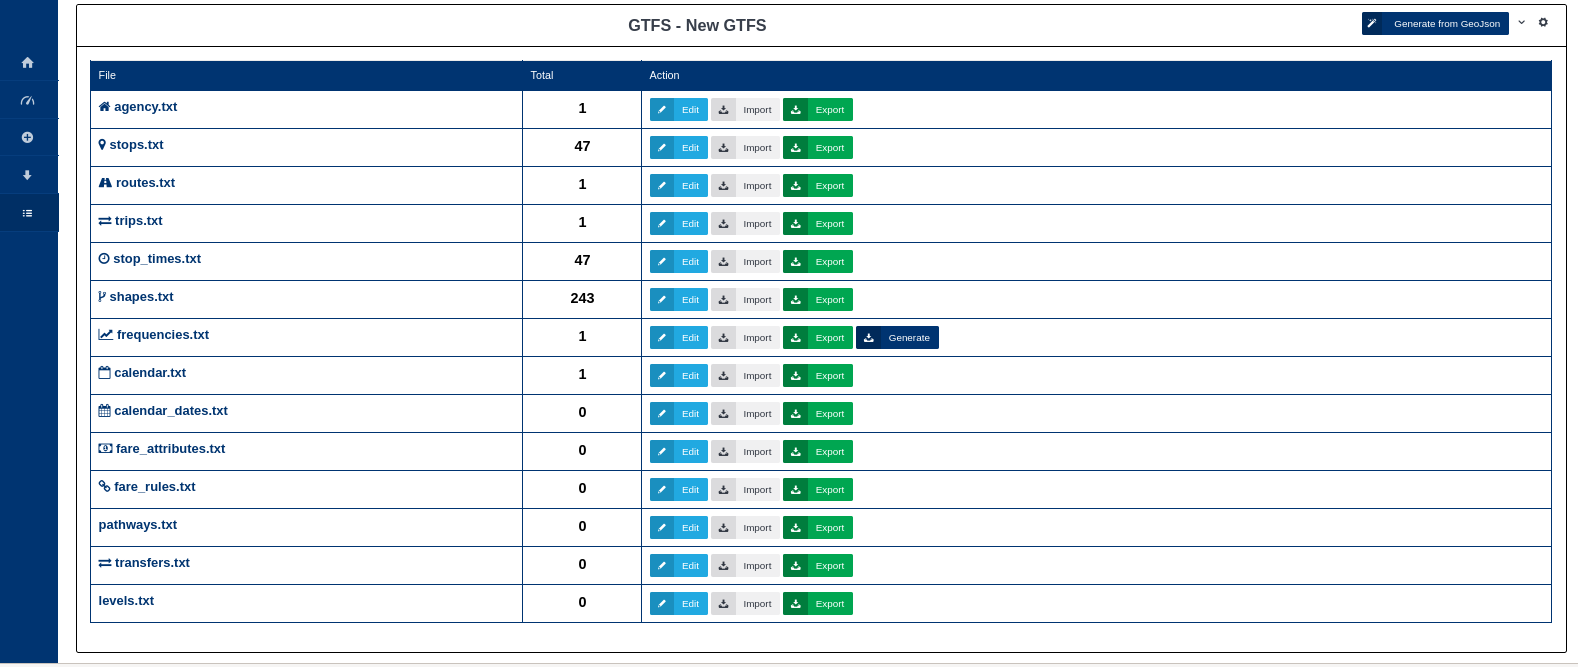
If OK you are presented with this interface which shows you different GTFS files that GTFS has edited, they are all empty at the start. Details about these files are explained via this link : GTFS reference
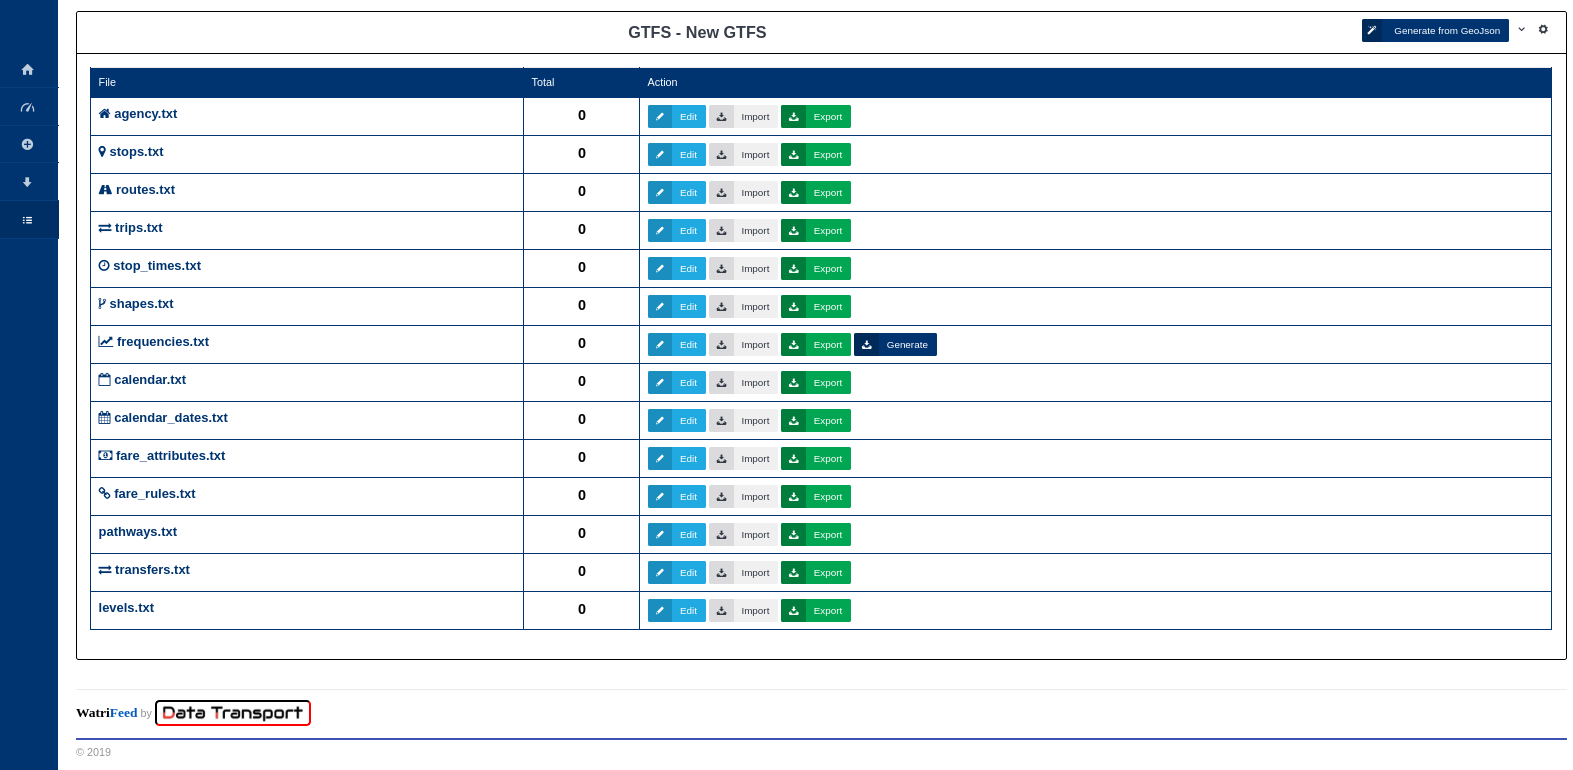
Step III: Creating GTFS Data
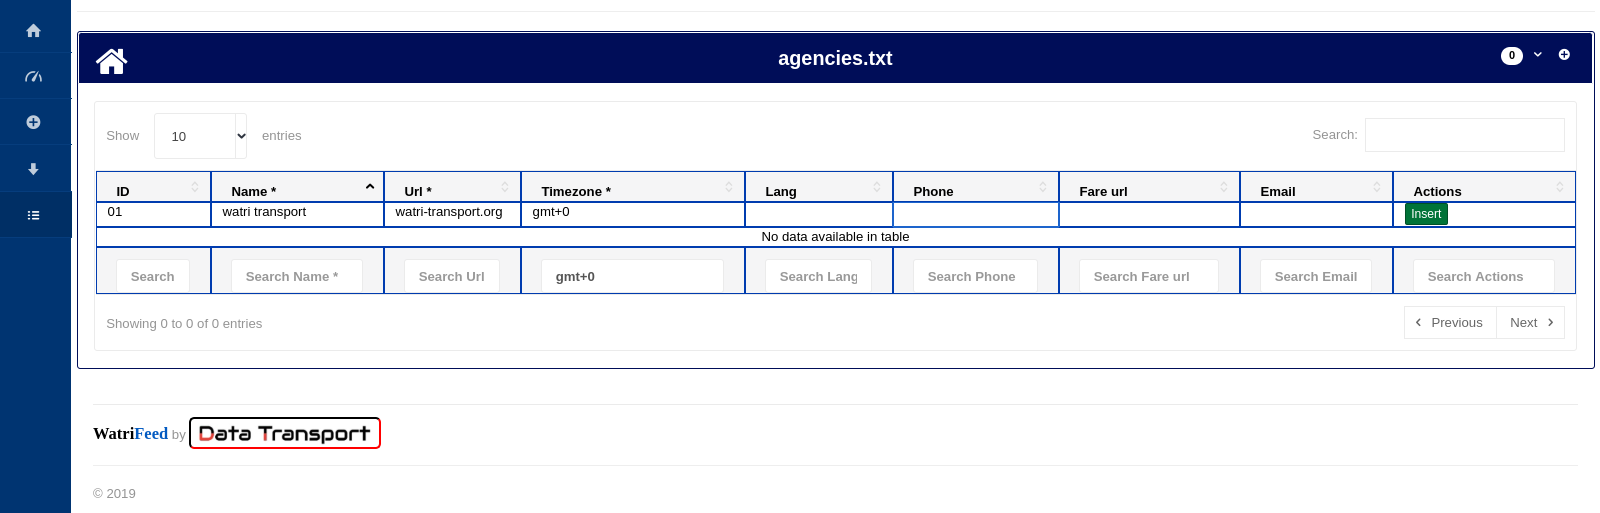
Editing will focus on the required GTFS format files. We are going to start our editing by creating the agency.txt , click on the Edit button and fill in the information that characterizes the transport company, such as its ID, name, website, timezone etc. if Ok click on the Insert button to add data
Clicking on Back
Ens
Next we will proceed with the import of data retrieved from OSM through Overpass :
Click on the Generate from Geojson button
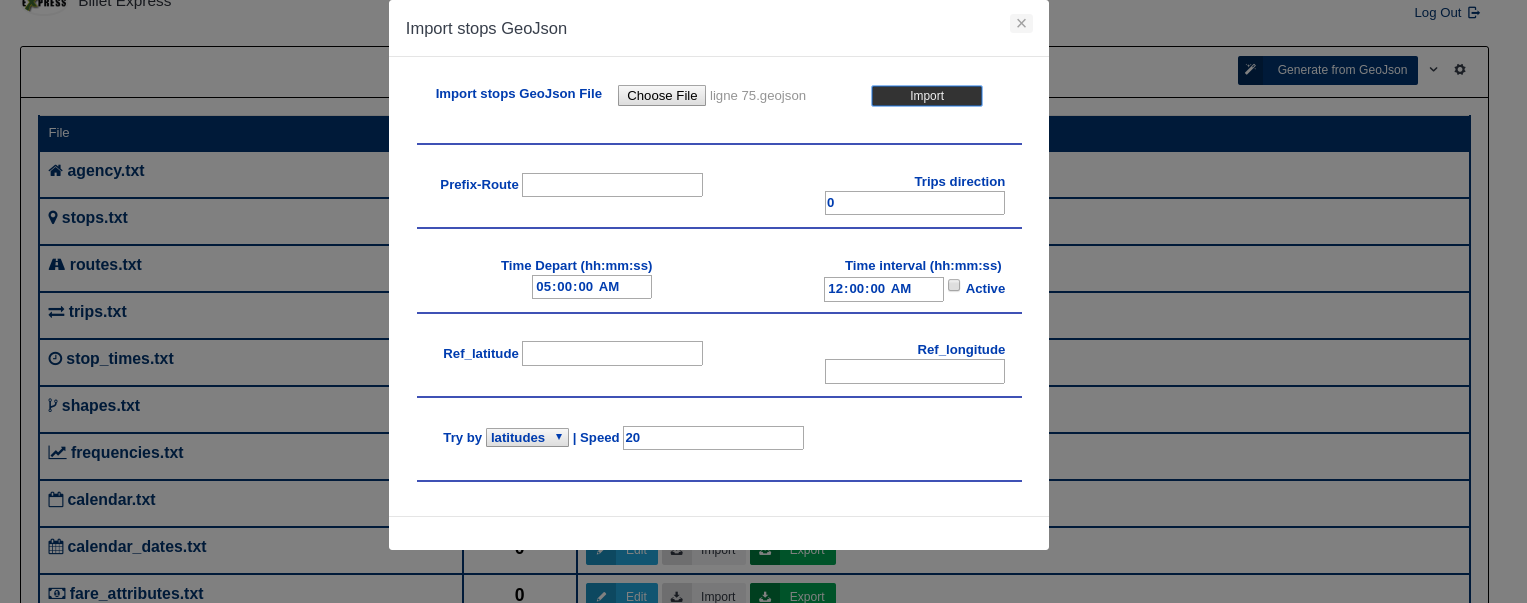
-We must choose the Geojson file using the choose file button here named line 75.geojson.
-Then fill in the field trip direction, 0 for departure or 1 for the return trip. Then fill in the field Time Depart for the time at which the transport service starts and Time interval, the service end time. In the Speed field, enter the average speed for the driver during the trip.
Note: The Time Depart, Time interval and Speed information is obtained previously after a field data collection. If the required fields are filled in, click on import, we obtain the following interface:
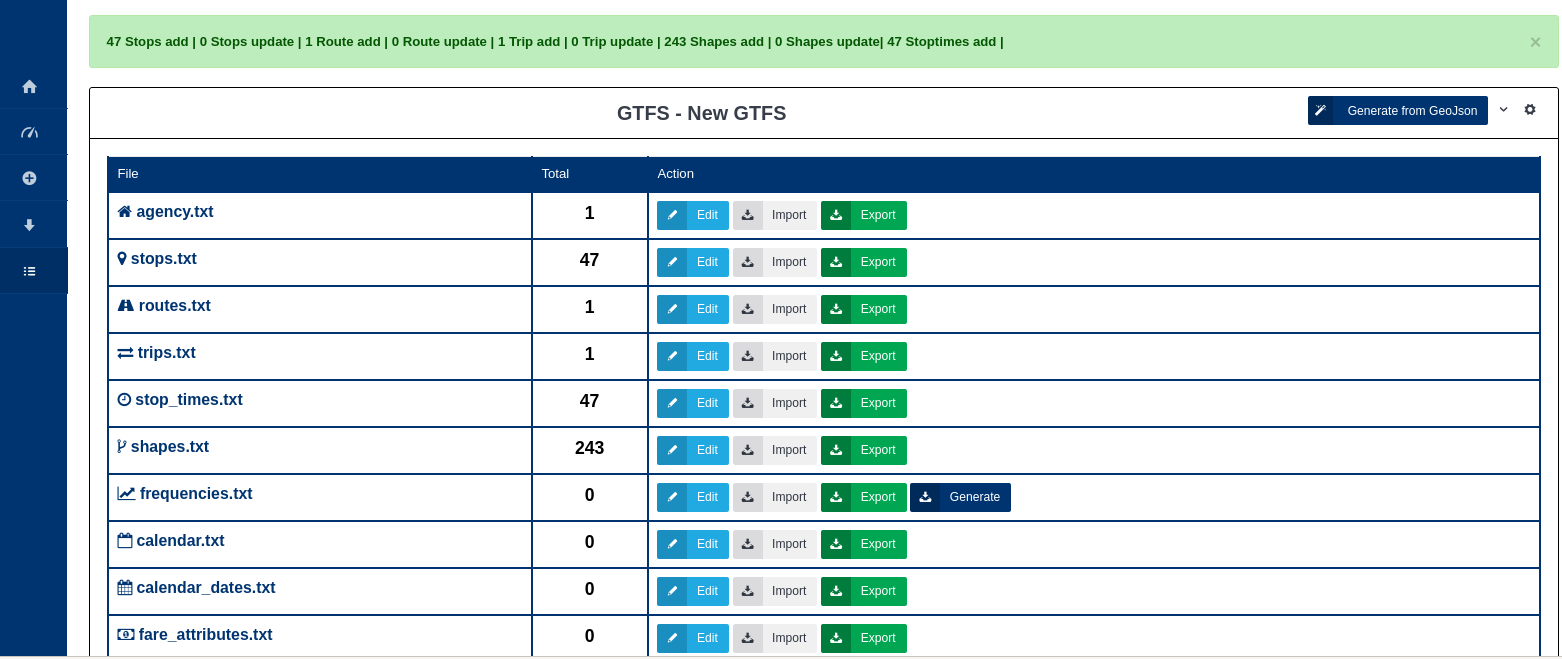
You will find that the import is done successfully and some files that were empty at the start are filled in. You can view the contents of each file by clicking on the Edit button.
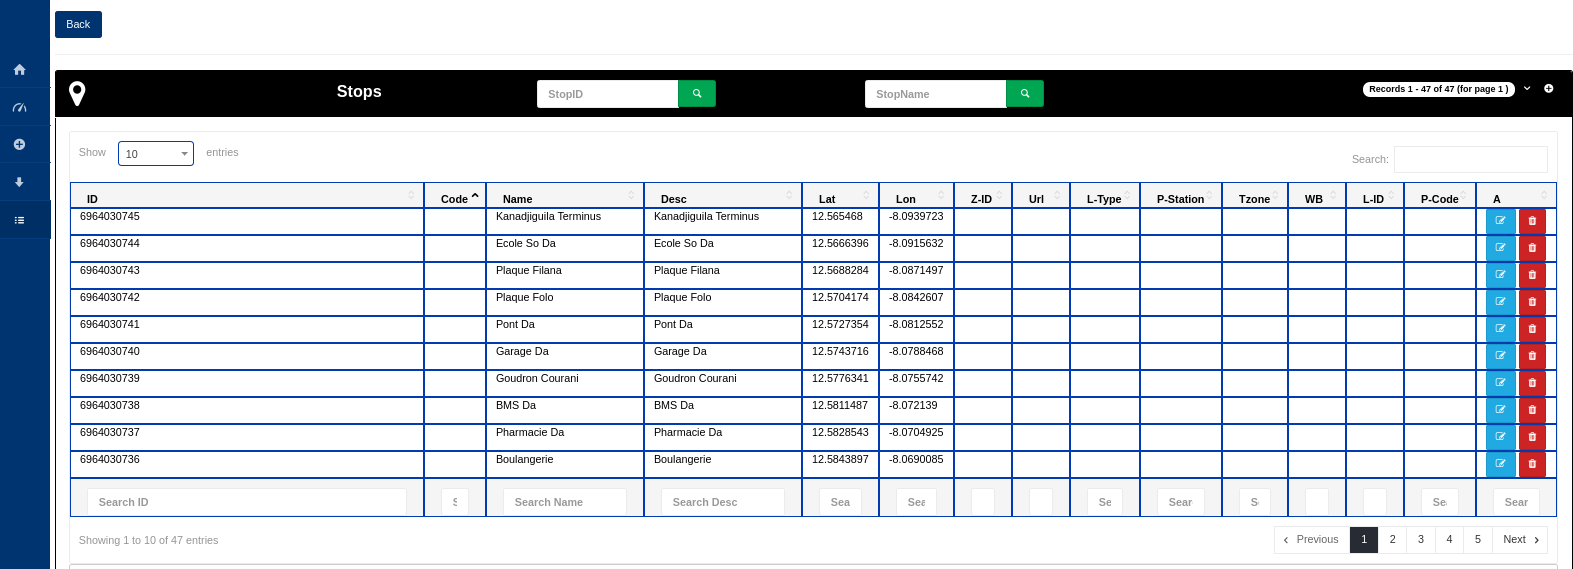
Let’s view together the stop file which contains all the bus stops for line 75.
The editable list of the stops :
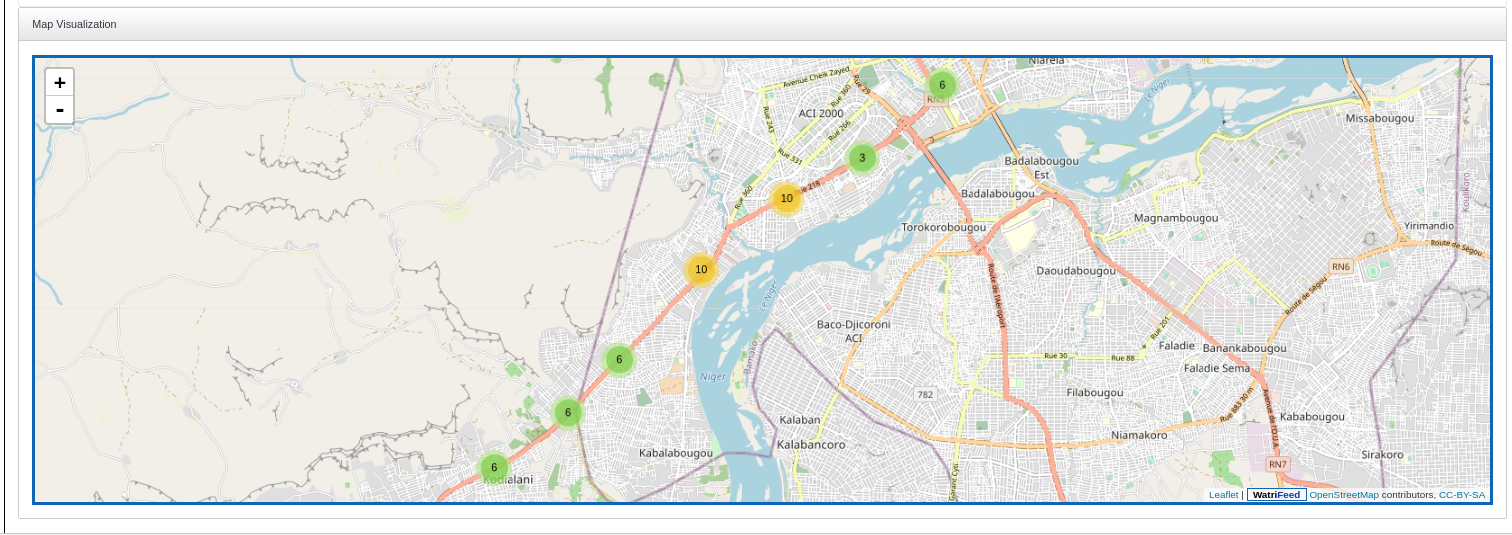
Stops visualization through a map :
Visualisation of the stop sequences and the travel time between the different stops through the file stop_times.txt :

It is possible to view all data available in the GTFS files that can be edited on WatriFeed.
Finally, we will finish by editing 2 files such as frequencies.txt and calendar.txt .
For frequencies.txt we will automatically generate the data of this file by clicking on the Generate button of frequencies.txt.
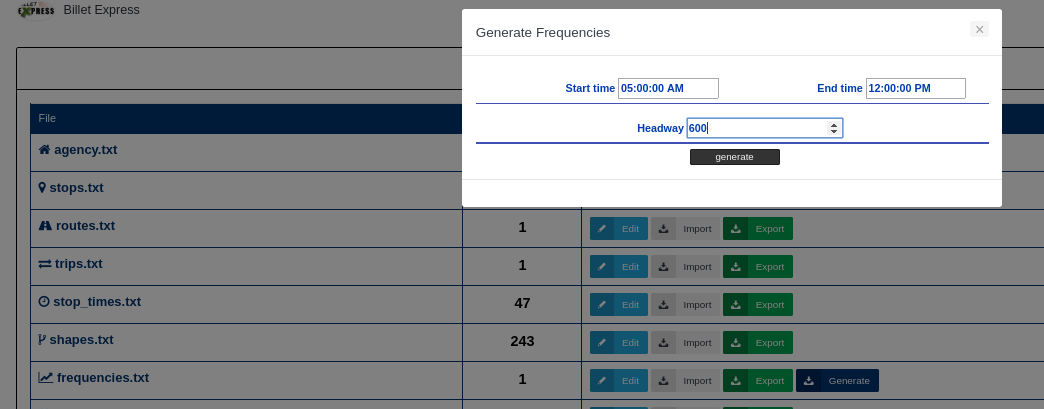
You fill in the Start time, End Time field for the starting and ending time of the service on the trip, then Headway the time interval in seconds between departures from the same stop (called “interval between transits”) for the trip, during the period specified by the start_time and end_time fields. Here headway = 600 which is worth 10 minutes. If Ok click on the generate button
Let’s finally edit the calendar.txt file which matches the service availability calendar.
Click on Edit on the file calendar.txt then fill in the fields
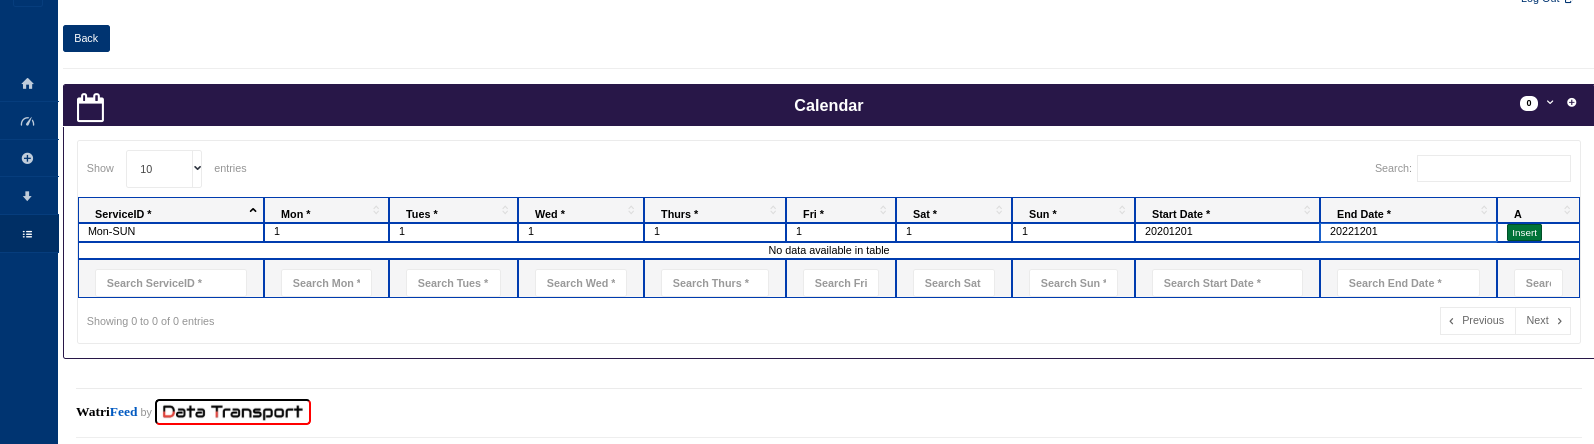
Fill in the service ID, then the days of availability and the calendar validity period . When a service is available its value is equal to 1 or 0 if unavailable.
If all is Ok for the specified line, our Interface looks like this:
The line editing is done. You have to repeat the same import process for all your lines forward and backward, this process allows you to make a control quality check while editing.
We can export your GTFS after editing simply by clicking on the Export button in the GTFS List menu.

Also you can export data file by file for visualization and editing via a worksheet.
NOTE: To create a GTFS file format via OpenStreetMap means first understanding the organizational framework of the target transport mode, then developing a robust methodology for data collection and mapping. Then a good technical and structural organization to guarantee the quality of the data.


